OpenCart Setup Guide
This is a step by step guide to integrating Nochex with your OpenCart website.
Customers are always recommended to back up their code before making any significant changes, such as the ones detailed in this document.
OpenCart 4 Installation Instructions
-
Firstly make sure you have downloaded the latest module files from here.
-
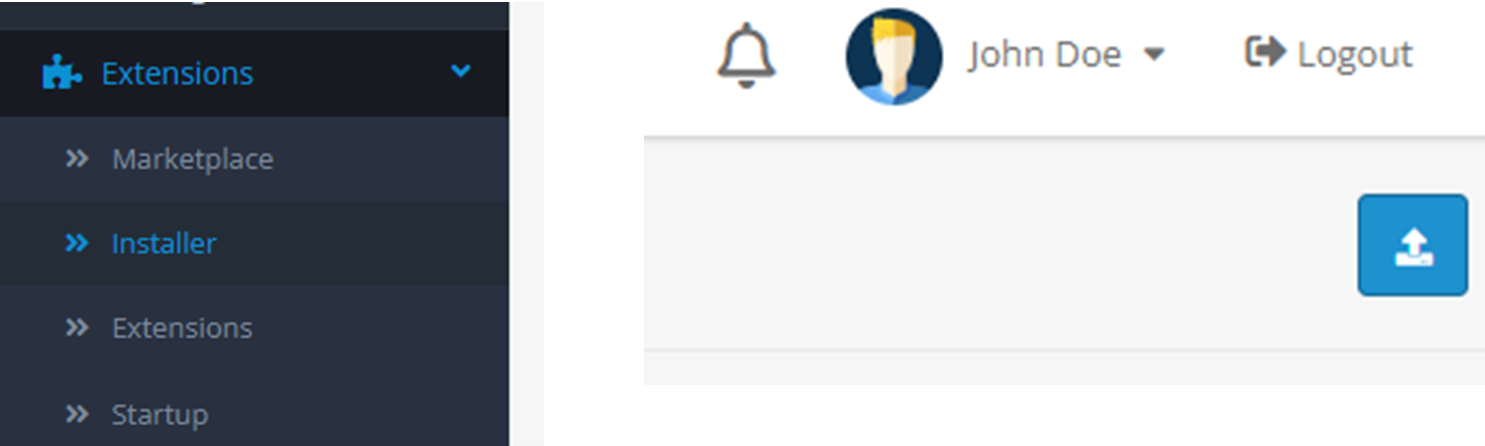
Login to your Open Cart Admin Section; go to Extensions > Installer and press the Upload button. Locate the .zip file from your support email and press Open.
- Locate the Nochex module in the Installed Extensions menu and press Install.

-
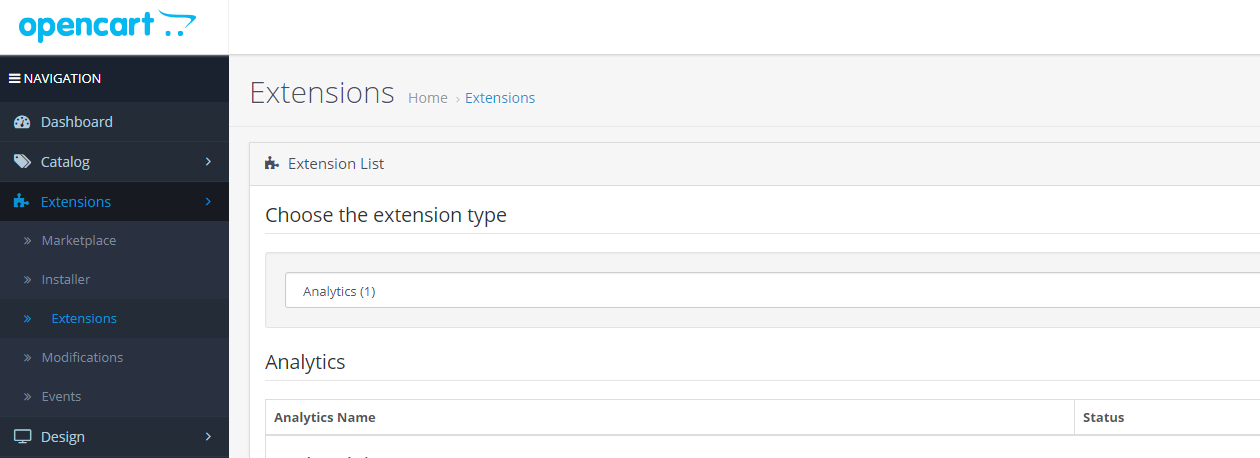
Go to Extensions > Extensions and then select payments in the drop down menu. Locate the Nochex module and click the edit button.

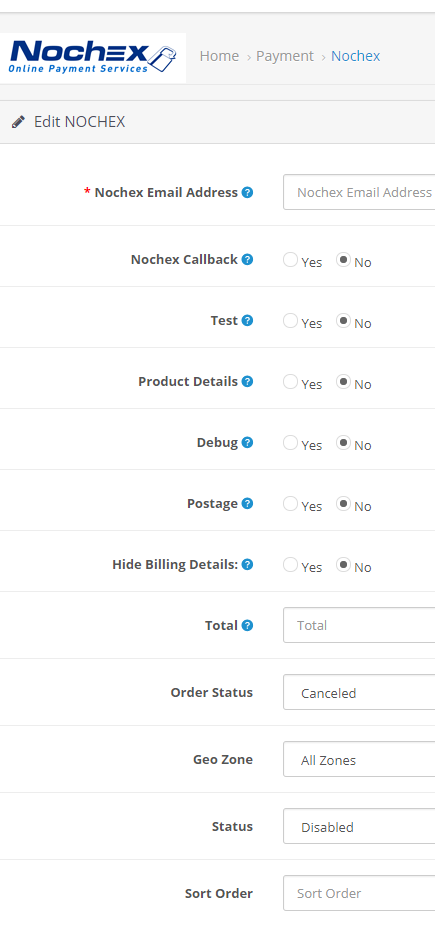
Fill in all of the relevant information;
-
(Required) Nochex Email Address - provided to you by Nochex
-
Test - Enable this option and do a test transaction by going through the checkout as a customer.
Always remember to uncheck the Enable Nochex Test Mode box when you want to start accepting live payments
-
Product Details - Enable this option to have a detailed list of purchased products on the payments page
-
Debug - Enables the module to create a detailed log of various stages of the checkout process
-
Hide Billing Details - Hides billing details on the payment page
-
Total - total amount before the payment method can be used
-
Order status - order updated to; once a payment has been made on an order
-
(Required) Status - Enabled
-
Save all changes
-
Finally go through your checkout process as a customer to make sure the Nochex module has integrated successfully into your shop.
OpenCart 3 Installation Instructions
-
First you must have OpenCart installed and setup on your website, as well as downloaded the latest version from our GitHub here.
-
Extract the Nochex extension files from the Zipped folder and go to your webserver, and where your website files are contained replace the existing files.
-
Login to your OpenCart admin section
- Next go to Extensions > Extensions
- Next Choose the extension type: Payments, and then look for Nochex then press the install button.

-
Once installed, click the edit button to show the settings for the Nochex extension.
-
Next fill in the details as shown on the right.
-
(Required) Nochex Email Address - This is your registered Nochex Email Address or additional merchant id.
-
Nochex Callback - This works similarly to the existing APC functionality. To use this you will need to contact your Account Manager.
-
Test Mode - Allows you to test the extension and make sure everything is working correctly.
Always remember to uncheck the Enable Nochex Test Mode box when you want to start accepting live payments
-
Product Details - Show product information in a structured format on your payment page.
-
Debug - Record information in relation to the extension, which can be used for detecting problems.
-
Postage - Show Postage separately to the amount on your payment page.
-
Hide Billing Details - Hide billing details on your payment page.
-
Total - Minimum Total before the Nochex module is used.
-
Order Status - Status that orders will be updated to once a payment has been made.
-
(Required) Status - Make sure Enabled is selected in order to show the Nochex extension on your checkout page.
-
Sort Order - Order of which the Nochex module is shown in the list of payment extensions on the payment page e.g. (0 - first, 1 - Second, etc;)
- Once all fields have been filled in, Press the blue save button at the top or bottom of the page.

- Finally go through your checkout process to make sure your extension has been setup correctly.