Cube Cart Setup Guide
This is a step by step guide to integrating Nochex with your Cube Cart website.
Important
Customers are always recommended to back up their code before making any significant changes, such as the ones detailed in this document.
Installation Instructions
Updating the module
-
Before you can enable Nochex as a payment option, you will need to update or add your new Nochex module files available here.
-
You will need to extract and copy the downloaded files into your website at the location Your website/modules/gateway/.
Enabling the module

-
Firstly, login to your Cube Cart account
-
Go to Manage Extensions in the Extensions section.
-
Within the Available Extensions list the Nochex APC module should be listed. Click the Edit button next to the Nochex module.

- You now need to enter your details;
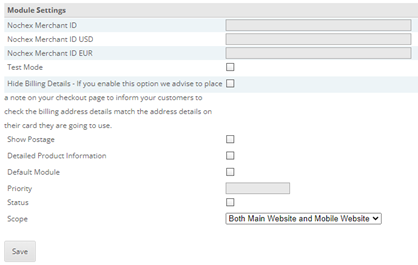
- (Required) Nochex Merchant ID: the ID associated with your account
- Test Mode: Put the module into to test mode where no money will be taken from accounts.
Important
Make sure this option is disabled when you want to take live payments
- Hide Billing Details: Makes billing detail inputs not appear on the payment form
- Show postage: Makes the postage cost show on the payment form
- Detailed Product Information: Makes the payment for display a more detailed list of the products
- (Required) Status: Enables the module to be used by customers
- Finally, test the module by going through the checkout as a customer