API Widget Setup Guide
A step by step guide to integrating the Nochex API Widget onto your website.
How the API Widget works
Our new Library makes use of front-end tools to make accepting card payments on your website both safe and easy to use. The widget renders a payment form for your customers to checkout and simultaneously establishes a secure link between the user’s computer/device and our payment API. Although an ssl certificate is mandatory for your site’s host, since no card information is passed through your servers the required processes to comply with PCI security standards are reduced.
Connections & url links that use http or contain mixed content (i.e. both secure and un-secure content) on the checkout page may be regarded as an un-secure and therefore blocked on security grounds.
Configuring my API checkout
Here’s how to configure your checkout:
-
To begin with, you should add a link to a JQuery library and the NOCHEX.JS library inside the
<head>section of your web page.<script src="https://secure.nochex.com/exp/jquery.js"></script>
<script src="https://secure.nochex.com/exp/nochex_lib.js"></script>infoThe JQuery library can be called from a multitude of different sources. You can download and host it on your own server, use the version from our secure servers (following the above link) or even by linking directly to an online version such as Google hosted libraries.
It’s worth checking a couple of things however to avoid any potential issues:
- The library’s version you are using is up-to-date
- It comes from a server that uses a valid ssl certificate (its served over https)
- There aren’t multiple links to the JQuery library declared (particularly different versions) on the same page as this may cause conflicts
The NOCHEX.JS library (nochex_lib.js) on the other hand, can only be called from our secure.nochex.com server and cannot be hosted on any other location or you will encounter issues during the payment process.
-
Create a
<form>element with anid="nochexForm"<form id="nochexForm" class="ncx-form" name="nochexForm"> </form> -
Next create a Pay Now/ Checkout button which will open up the payment form. Create a
<button>like the one shown below and place anywhere inside the body of your page (<body>…</body>). You can now add any text and style of the button to your liking though in order for the library to recognise it you must assign it an id="ncx-show-checkout"<button id="ncx-show-checkout" title="Checkout"> Pay Now </button>infoAs the
<button>is a JavaScript and not an HTML element, it does not require nesting inside the<form>. In fact as the form will be hidden at rendering it’s recommended to place the button outside your nochex form. -
Now you should add your Configuration script. This will be the main means of communication from the web page to the library before the customer checks out. Create a
<script>element with anid="ncx-config". Now attach it directly inside your<form>element and begin declaring your transaction parameters in the<script>tag as show below.<form id="nochexForm" class="ncx-form" name="nochexForm">
<script id="ncx-config"
ncxField-api_key="nvk############################"
ncxField-merchant_id="primary@email.co.uk"
ncxField-amount="1.99"
ncxField-test_transaction="true"
ncxField-use_apc="true">
</script>
</form>This information can be collected from you site prior. For example, below is example code for collecting the data and adding it to the config script in VB.Net:
- ASPX
- VB
<%@ Page Language="vb" AutoEventWireup="false" CodeBehind="default.aspx.vb" Inherits="WebApplication1._default"%>

<!DOCTYPE html>

<html xmlns="http://www.w3.org/1999/xhtml">
    <head runat="server">
        <title></title>
    </head>
    <body>
        <form id="form1" runat="server">
            <div class="row">
                <div class="col-md-3"><label>First Name</label></div>
                <div class="col-md-5"><asp:TextBox ID="txtFName" runat="server"></asp:TextBox></div>
                </div>

            <div class="row">
            <div class="col-md-3"><label>Last Name</label></div>
            <div class="col-md-5"><asp:TextBox ID="txtLName" runat="server"></asp:TextBox></div>
            </div>
            <div class="row">
            <div class="col-md-3"><label>Contact Number</label></div>
            <div class="col-md-5"><asp:TextBox ID="txtConNum" runat="server" TextMode="Phone"></asp:TextBox></div>
            </div>
            <div class="row">
            <div class="col-md-3"> <label>Email Address</label></div>
            <div class="col-md-5"><asp:TextBox ID="txtEmail" runat="server" TextMode="email"></asp:TextBox></div>
            </div>
            <div class="row">
                <div class="col-md-12"><asp:Button ID="btnShowAPI" runat="server" Text="Pay Now" /></div>
            </div>
        </form>

        <button id="ncx-show-checkout" title="Checkout" style="display:none"> Pay Now </button>
        <input type="button" id="ShowAPI" onclick="document.getElementById('ncx-show-checkout').click()" style="display:none;" />

        <div id="loadTxt" runat="server">

        </div>
    </body>
</html>
Public Class _default
Inherits System.Web.UI.Page
Protected Sub btnShowAPI_Click(sender As Object, e As EventArgs) Handles btnShowAPI.Click
Dim txtFirstname As String = txtFName.Text
Dim txtLastname As String = txtLName.Text
Dim txtEmailAdd As String = txtEmail.Text
Dim txtContactNum As String = txtConNum.Text
loadTxt.InnerHtml = "<script src=""https://secure.nochex.com/exp/jquery.js""></script>
<script src=""https://secure.nochex.com/exp/nochex_lib.js""></script>
<form id=""nochexForm"" class=""ncx-form"" name=""nochexForm"">
<script id=""ncx-config""
ncxField-api_key=""nvk############################""
ncxField-merchant_id=""TheLongIslandWatches""
ncxField-amount=""19.50""
ncxField-test_transaction=""true""
ncxField-use_apc=""true""
ncxField-fullname=" & txtFirstname & " " & txtLastname & "
ncxField-email=" & txtEmailAdd & "
ncxField-phone=" & txtContactNum & ">
</script>
</form>
<script>setTimeout(function() { document.getElementById(""ncx-show-checkout"").click(); }, 500);</script>"
End Sub
End Class
Here you can declare:
- The amount of the transaction (Payment Information)
- Your unique key and merchant id (Merchant Identification)
- Any Optional Information you might wish to include to your payment
- If you already hold any relevant Customer Details, for example in case your customer has previously registered an account on your website; you can choose attach it in your Configuration script
Please refer to the “API Configuration parameters at the end of this page for the complete list of available parameters.
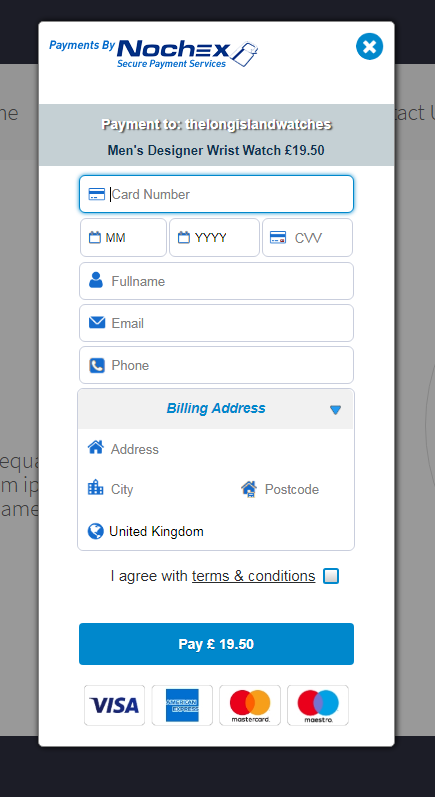
Checkout generated
Additional Features
-
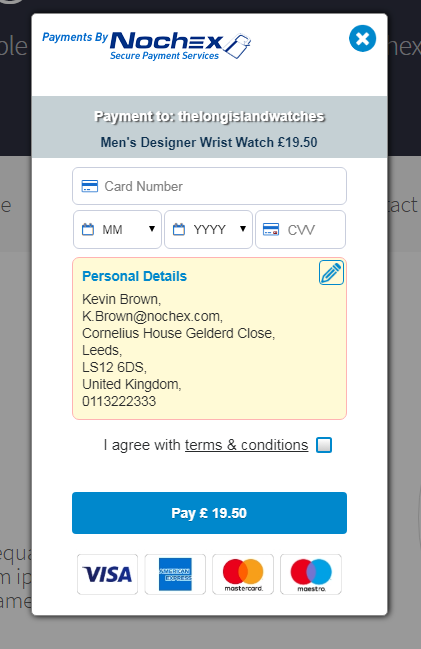
Pre-populated Data If you wish to improve the checkout experience on your website you can make use of the “pre-populated data” feature. This will allow you to pre-fill any data you may already have for a specific customer before they reach the checkout page.
Think of this as “express checkout” for customer who have previously registered or placed an ordered from your website in the past. Below you can see a complete example of a checkout using the Configuration script to pre-populate the Customer Details.
<!DOCTYPE html>
<html>
    <head>
        <script src="https://secure.nochex.com/exp/jquery.js" ></script>
        <script src="https://secure.nochex.com/exp/nochex_lib.js" ></script>
    </head>

    <body>
        <button id="ncx-show-checkout" title="Checkout"> Pay Now </button>

        <form id="nochexForm" class="ncx-form" name="nochexForm">
            <script id="ncx-config"
                ncxField-description="Men's Designer Wrist Watch £19.50"
                ncxField-api_key="nvk############################"
                ncxField-merchant_id="TheLongIslandWatches"
                ncxField-amount="19.50"
                ncxField-fullname="Kevin Brown"
                ncxField-email="K.Brown@nochex.com"
                ncxField-phone="0113 222 333"
                ncxField-address="Cornelius House, Gelderd Close"
                ncxField-city="Leeds"
                ncxField-postcode="LS12 6DS"
                ncxField-country="United Kingdom"
                ncxField-order_id="ABV-1234"
                ncxField-test_transaction="true"
                ncxField-use_apc="true"
                ncxField-success_url ="https://www.mySite.com/success_page.html"
                ncxfield-callback_url="https://mywebsite.com/apchandler.php"
            ></script>
        </form>
    </body>
</html>infoRemember to replace your ncxField-api_key & ncxField-merchant_id fields with the API key and merchant_id you’ve been provided.
Resulting Checkout:
- You are also able test a live transaction by removing the relevant parameter (ncxField-test_transaction) from your Configuration script or by simply setting its value to false.
infoMuch like any other Nochex payment methods in order to make live payments with the Library and API you must first ensure that your Nochex account has been fully registered and it’s been enabled to accept payments.
-
Delivery Details & Optional Data
If your shop requires delivery details to be recorded with your transactions and you’d like the Nochex checkout to handle that you should add the following flag to your Configuration script to request it:
<script ...
    ncxField-request_delivery_dtls="True"
></script>
When this is assigned to true, the checkout will set delivery details as mandatory fields.
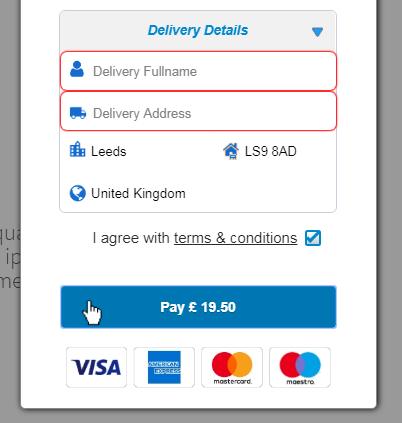
As in the previous examples, if you already have that data you can prepopulated it like so:
<script ...
    ncxField-delivery_fullname="Kevin Brown"
    ncxField-delivery_address="Flat 25, St. Tomas Square"
    ncxField-delivery_city="Leeds"
    ncxField-delivery_postcode="LS9 8AD"
></script>
Additional Optional Information you can attach to your Configuration script include an Order ID, that can be used to reference entries in your CRM system, a success_url, where your customer will be redirected after a payment is complete and an extra 5 parameters (Optional 1-5) which you can utilize as you see fit. To find out more on these parameters including the exact syntax to be used refer to the complete list of “API Configuration parameters”
-
Success Page
Finally it is also possible to configure your success and failure pages to reflect the details of the transaction that was attempted as shown in the example below.
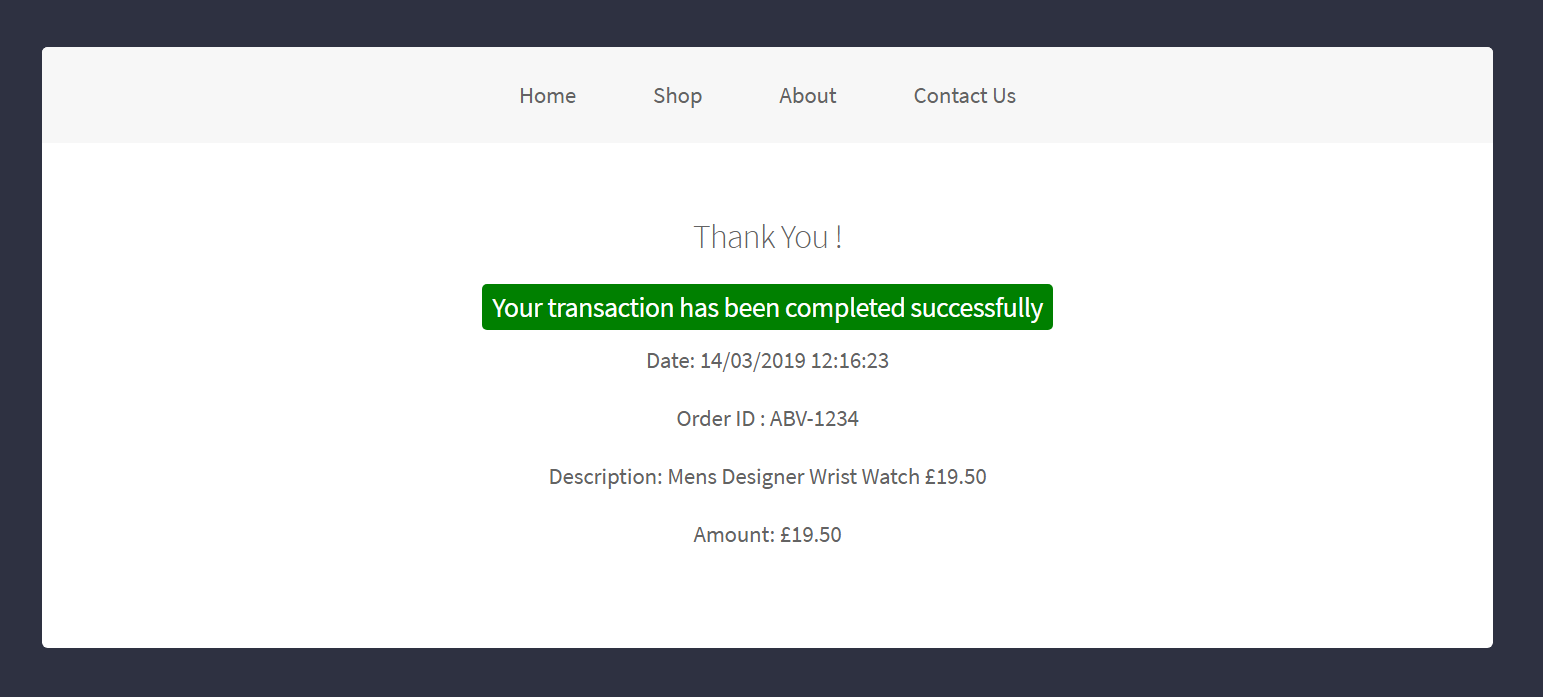
When redirecting the user to the success page of your choosing the Library will also submit the following parameters using a form post.
Field Name Description Variable Type transaction_dateThe full Date and Time of the transaction DateTime amountThe transaction amount Decimal order_idYour chosen Order ID Mixed content descriptionYour attached Payment Description Mixed content test_transactionTest transaction flag Boolean (True/False) Here’s the source code used for the example shown above. This one using PHP
<table>
<tr>
<td>
<h2>Thank You!</h2>
<p class="ncx-alert-success">
Your transaction has been completed successfully
</p>
<p>Date:
<?php echo $_POST['transaction_date'] ?>
</p>
<p>Order ID:
<?php echo $_POST['order_id'] ?>
</p>
<p>Description:
<?php echo $_POST['description'] ?>
</p>
<p>Amount:
£ <?php echo $_POST['amount'] ?>
</p>
</td>
</tr>
</table>
Payment Confirmation
The only reliable method for your website’s managment system to establishing when a successful transaction has been received is through the use of our Automatic Payment Confirmation (APC). In order to integrate APC into your API widget; you will first need to create a listener page, host it inside your website and then point your callback_url parameter to your listener page. Finally add the necessary logic to update your management system inside the “AUTHORISED” section of the code.
It is important you don’t host any code that creates an order on the success page as this practice and has often shown to backfire. Payments can be manipulated, customers can simply elect to close their window before getting to the success url or even reload their page once they get there creating multiple orders.
Step by step instructions:
-
Start by downloading one of our sample pages from our repository depending on the coding language you are using: Link to sample Pages
-
Next, in order to preview the APC functionality, edit the code of your listener page replacing your_email@example.com with a valid email address and then upload it to your website.
-
Finally assign your callback url parameter inside your configuration script to the url of the listener page as in the example below and then perform a test transaction.
ncxfield-callback_url="https://mywebsite.com/apchandler.php"
Checkout the APC page for more information.
If your configuration is correct, you should receive an email with the parameters of your transaction that were posted to your callback url page
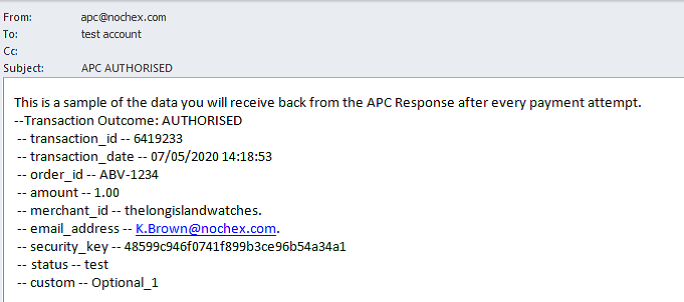
You can now use these variables inside your listener page code to update your website’s database or forward them to staff or customers.
Before marking an order as “complete”, you should always perform additional checks in your code to prevent data tampering from affecting your payments. Specifically, you must ensure that the data you received in your callback response, particularly the payment amount, matches the data stored in your site’s database for the same order.
Should you notice anything irregular about one of your payments or if you simply wish to make sure a high value transaction has been processed correctly you can always double check:
- The Nochex Payment Confirmation email you received for that payment
- That the payment is listed in your Transactions History which can be accessed from your Nochex Control Panel
If you have reasons to suspect foul play was involved in any of your payments, please don’t hesitate to report it to us at: Merchant@Nochex.com and we will be happy to investigate it on your behalf.
API Configuration Script Parameters
Configuration parameters which are not in the correct format will simply be ignored by the Library so please verify your script doesn’t contain any typos or grammatical errors before release.
-
Default & Optional Parameters
Fields Content Type Max Length Feild Group Feild Name Description API Key Alphanumeric 40 Merchant Identification [Required] ncxField-api_keyAPI Key is a unique code you’ve been provided with, identifying your account Merchant ID Alphanumeric 64 Merchant Identification [Required] ncxField-merchant_idThis must match your primary email or an alias from your Nochex account Amount Numeric (Decimal) 10 Payment Information [Required] ncxField-amountThe value of the transaction that’s being processed Enable Automatic Payment Confirmation (APC) Flag Boolean (True/False) 10 Payment Information [Required] ncxField-use_apcEnable APC confirmation. Currently the only form of verifying the result of transactions so it should be set to true Callback URL Mixed Content 200 Payment Information [Required] ncxfield-callback_urlThis should be assigned to the URL of the APC listener page hosted on your website Success URL Mixed Content 200 Optional Information ncxField- success_urlIf it contains a value the customer will be redirected to this url after a successful payment Test Transaction Boolean (True/False) 80 Optional Information ncxField-test_transactionIf present and containing a value of True set checkout to test mode Request Delivery Details Flag Boolean (True/False) 10 Optional Information ncxField- request_delivery_dtlsWhen set to true delivery details will be requested from your customers Payment Description Alphanumeric (some special chars. allowed) 80 Optional Information ncxField-descriptionAny description or comment you’d like to attach/display for the payment Order ID Mixed Content 50 Optional Information ncxField-order_idAny meaningful ID or similar you’d like to attach to the payment -
Customer Data Parameters (Pre-populating)
Fields Content Type Max Length Field Group Field Name Description Customer Full name Text 120 Customer Details [Optional] ncxField-fullnameThe name and surname of the customer Customer Email Alphanumeric (some special chars. allowed) 64 Customer Details [Optional] ncxField-emailThe customer’s email address Customer Full Address Alphanumeric (some special chars. allowed) 300 Customer Details [Optional] ncxField-addressThe first and second line of the Billing address Customer City/Town Text 30 Customer Details [Optional] ncxField-cityBilling address, Town or City Customer Post Code / Zip Code Alphanumeric 10 Customer Details [Optional] ncxField-postcodeThe billing address post code Customer Phone number Numeric 20 Customer Details [Optional] ncxField-phoneCustomer’s telephone number Customer Country Text 100 Customer Details [Optional] ncxField-countryThe customer’s billing country Customer State (US) Text 100 Customer Details [Optional] ncxField-stateThe customer’s billing State (Only used when country is set to USA) Delivery Full name Text 120 Customer Details [Optional] ncxField-delivery_fullnameThe full name to be included in the delivery details Delivery Address Alphanumeric (some special chars. allowed) 300 Customer Details [Optional] ncxField-delivery_addressThe first and second line of the delivery address Delivery City/Town Text 30 Customer Details [Optional] ncxField-delivery_cityBilling address Town or City Delivery Post Code / Zip Code Alphanumeric 10 Customer Details [Optional] ncxField-delivery_postcodeBilling address post code Customer Country Text 100 Customer Details [Optional] ncxField-delivery_countryFull name of the customer’s billing country Delivery Full name Text 120 Customer Details [Optional] ncxField-delivery_fullnameThe name and surname of the customer Delivery State (US) Text 100 Customer Details [Optional] ncxField-delivery_stateThe delivery State (Only used when country is set to USA) -
Additional Optional Data
Field Content Type Max Length Field Group Field Name Description Use URL Parameters on Success Page Boolean (on/off) 3 Optional Information ncxField-success_url_parametersWhen value set to “on” checkout will utilise url paramters to return transaction data to your success page. Otherwise it will default to using Form Post Auto-Redirect Flag Boolean (True/False) 10 Optional Information ncxField-autoredirectIf set to True the customer will be automatically redirected to the success page without having to click “OK” Optional Field 1 Mixed Content 100 Optional Information ncxField-optional_1These fields can be used to include any meaningful data you might wish to include Optional Field 2 Mixed Content 100 Optional Information ncxField-optional_2These fields can be used to include any meaningful data you might wish to include Optional Field 3 Mixed Content 100 Optional Information ncxField-optional_3These fields can be used to include any meaningful data you might wish to include Optional Field 4 Mixed Content 100 Optional Information ncxField-optional_4These fields can be used to include any meaningful data you might wish to include Optional Field 5 Mixed Content 100 Optional Information ncxField-optional_5These fields can be used to include any meaningful data you might wish to include