Payment Page - Integration
Introduction to the Nochex Payment Pages
The Nochex Payments Pages use HTML forms to send information about your customer's purchases to Nochex. Most Nochex account holders choose this integration method because they do not need advanced development skills to start accepting payments.
You will need some basic knowledge of HTML and HTML Forms. If you have a database that needs to be updated automatically as transactions complete, you will need more advanced web development skills, including knowledge of a server-side scripting language. Remember! We are here to help you and to get your business up and running as quickly as possible!
As Nochex manages the Payments Page, you do not have to worry about securely handling card details or managing security certificates for the payment section of your website. You or your customer simply needs to tell Nochex how much you want to be paid (and optionally what for) and Nochex will handle the collection of this money and reimburse your bank account once instructed to do so.
This document has been written to inform and describe the process of integrating Nochex Payments Pages within websites and third party software. The guide also describes the various functions available to Nochex customers.
Throughout the guide, we use an example of a fictional Nochex account holder: You can see Joe's website here ukgadgetsrus.com from which he sells over 300 electrical items, ranging in price from £10 to £250. He operates purely online and has chosen to use Nochex to process his debit and credit card transactions.
Requirements
Firstly you must have set up a Nochex account. When you apply for an account, you are required to enter an email address, which will be used as your login to your online account. Nochex will send payment confirmations and all necessary correspondence to this email address as well, so we recommend that it is your primary email address, or one that is regularly accessed. The email address that you submit to Nochex is also referred to as your Merchant ID. This can be changed at a later date if required.
Setting up Nochex Payments Pages
The Nochex Payments Pages can transmit information such as additional billing or delivery information, as well as the necessary parameters of the amount and merchant ID.
The following sections detail what information can be transmitted and includes some sample HTML forms that can be used on your website to post to the Nochex Payments Page.
Payment Pages sample HTML Form
Examples of the code that Joe Fox may use are shown below:
Example - Payment Form 1
<form method="POST" action="https://secure.nochex.com/">
<input type="hidden" name="merchant_id" value="{Your Merchant ID}">
<input type="hidden" name="amount" value="{Your Payment Amount}">
<input type="hidden" name="description" value="{Your Order Description}">
<input type="hidden" name="order_id" value="{Your Order ID}">
<input type="submit" value="Pay on Credit or Debit Card with Nochex">
</form>
However Joe has also decided that he wants the customer's phone number, billing postcode to be passed through the system so has added these below. By doing this he can monitor orders easily where the billing and delivery postcodes do not match. For anti-fraud purposes, Joe does not deliver to customers whose billing and delivery addresses do not match up so by having the phone number provided as well, he can quickly contact customers who provide differing addresses. In this instance, the customer has provided the same billing and delivery postcodes and the form information would be sent to Nochex as per Form Example 2. More information on the additional parameters can be found here.
Example - Payment Form 2
<form method="POST" action="https://secure.nochex.com/">
<input type="hidden" name="merchant_id" value="joefox@ukgadgetsrus.com">
<input type="hidden" name="amount" value="55.60">
<input type="hidden" name="description" value="Order from UKGadgetsrus">
<input type="hidden" name="order_id" value="GRU1625">
<input type="hidden" name="billing_postcode" value="LS99 1NC">
<input type="hidden" name="customer_phone_number" value="01134320987">
<input type="submit" value="Pay on Credit or Debit Card with Nochex">
</form>
Payments Pages URL & Parameters
Payments Pages - URL
The URL used for posting information to the Nochex Payments page is https://secure.nochex.com/ as seen in the examples on the previous page. Both GET and POST form requests are accepted when sending the payments pages parameters through to the URL.
Payments Pages - Parameters
| Parameter Name | Required? | Description |
|---|---|---|
merchant_ID | Yes | The merchant id required to identify your account. Your default merchant id is the email address you use with your Nochex account |
amount | Yes | The amount you wish to be paid. This will be added to the total payment |
description | No | A "friendly description" of the payment you are requesting, usually used to describe to your customer the goods or services you are requesting payment for |
order_id | No | Your identifier for the requested payment |
success_url | No | The URL that your customer is directed to once the payment has been successfully completed |
cancel_url | No | The URL that your customer is directed to if they decide to cancel the payment. The cancel button is only shown on the Payments page if this parameter is set |
callback_url | No | The URL that Nochex will send a notification to once a successful payment is made. At this stage the APC functionality that you may currently be using is unchanged |
billing_fullname | No | The full name of your customer as appears on the customer's card statements. This can be pre-populated by you if you have already collected this information |
billing_address | No | The full address of your customer as appears on the customer's card statements. This can be pre-populated by you if you have already collected this information |
billing_city | No | The city of your customer as appears on the customer's card statements. This can be pre-populated by you if you have already collected this information |
billing_country | No | The country of your customer as appears on the customer's card statements. This can be pre-populated by you if you have already collected this information |
billing_postcode | No | The post code of your customer's card billing address. This can be prepopulated by you on the payments page if you have already collected this information |
delivery_fullname | No | The full name of your customers preferred delivery address. This can be pre-populated by you if you have already collected this information |
delivery_address | No | The full address of your customers preferred delivery address. This can be pre-populated by you if you have already collected this information |
delivery_city | No | The full address of your customers preferred delivery address. This can be pre-populated by you if you have already collected this information |
delivery_country | No | The country of your customers preferred delivery address. This can be pre-populated by you if you have already collected this information |
delivery_postcode | No | The post code of your customers preferred delivery address. This can be pre-populated by you if you have already collected this information |
customer_phone_number | No | The phone number of your customer. This can be prepopulated by you if you have already collected this information |
email_address | No | The email address of your customer. This can be pre-populated by you if you have already collected this information |
postage | No | The postage cost of the item your customer is buying |
insurance | No | The insurance cost of the item your customer is buying |
optional_1 | No | Can pass custom data you do not wish the customer to see to the Payments page and have it returned to you by the APC (please note that at this stage this parameter will currently be passed back to you as "custom") |
ask_more_info | No | The 'ask more information' field where customers can enter any additional information regarding the order will be shown if set to "1" |
ask_more_info_caption | No | The text next to the "ask more information" field |
Advanced Optional Parameters - Hide Billing Details
When enabled the hide billing details functionality ensures that the customer does not amend their address during the checkout process. It does not have to be used so please ignore this section if you are unsure about it or do not require it. The parameter to enable the hide billing details option is shown below.
| Parameter Name | Required? | Description |
|---|---|---|
hide_billing_details | No | If the parameter is set to "True" the card holder name, address, post code and number will be hidden and therefore cannot be changed |
If the parameters for the card holder name, address or postcode are not passed through to the Nochex payments pages then all three fields will be shown; as a result the customer can enter their details. The same principle is applied for the customer's phone number. Therefore, the parameters below also need to be included within the POST/GET request to Nochex when the "hide_billing_details" parameter is set to "True".
Example - Payment Form - Hide Billing Details
<form method="POST" action="https://secure.nochex.com/">
<input type="hidden" name="merchant_id" value="joefox@ukgadgetsrus.com">
<input type="hidden" name="amount" value="55.60">
<input type="hidden" name="hide_billing_details " value="true">
<input type="hidden" name="billing_fullname" value="New Customer">
<input type="hidden" name="billing_address" value="1 Leeds Street">
<input type="hidden" name="billing_address" value="Leeds">
<input type="hidden" name="billing_postcode" value="LS99 1NC">
<input type="hidden" name="customer_phone_number" value="01134320987">
<input type="submit" value="Pay on Credit or Debit Card with Nochex">
</form>
Advanced Optional Parameters - Xml Item Collection
The xml_item_collection is a parameter that can display product details in a structured table format on your payment page. It does not have to be used so please ignore this section if you are unsure about it or do not require it. The parameter xml_item_collection is shown below;
| Parameter Name | Required? | Description |
|---|---|---|
Xml_item_collection | No | If the parameter is enabled, there is set xml_data that needs to be attached to the value. For example:<items><item><id></id><name></name><description></description><quantity></quantity><price></price></item></items> |
All of the xml_item_collection fields inside the parameter are needed to be used in order to display the structured table format on your payment page. If one field is missing from the xml_item_collection parameter, the product details will not be displayed. As a result of this, when assigning products to the item collection a set template for each of the fields are present in order to send product details in the xml_item_collection.
| Xml_item_collection (Data Fields) | Description | Example |
|---|---|---|
| Items | The 'Items' field is a collection of products. | 1, test, description, 1, £1.23 2, test_2, description_2, 2, £2.34 |
| Item | The 'Item' field is a collection of individual product details | 1, TShirts, red width 200x100, 1, 1.23 |
| ID | The 'ID' field is the identifier of a product | 1 |
| Name | The 'Name' field is the name of theproduct. | TShirts |
| Description | The 'Description' field is characteristics or information about the product. | red width 200x100 |
| Quantity | The 'Quantity' field is how many products have been ordered. | 1 |
| Price | The 'Price' field is the total cost, and quantity of a product. | 1.23 |
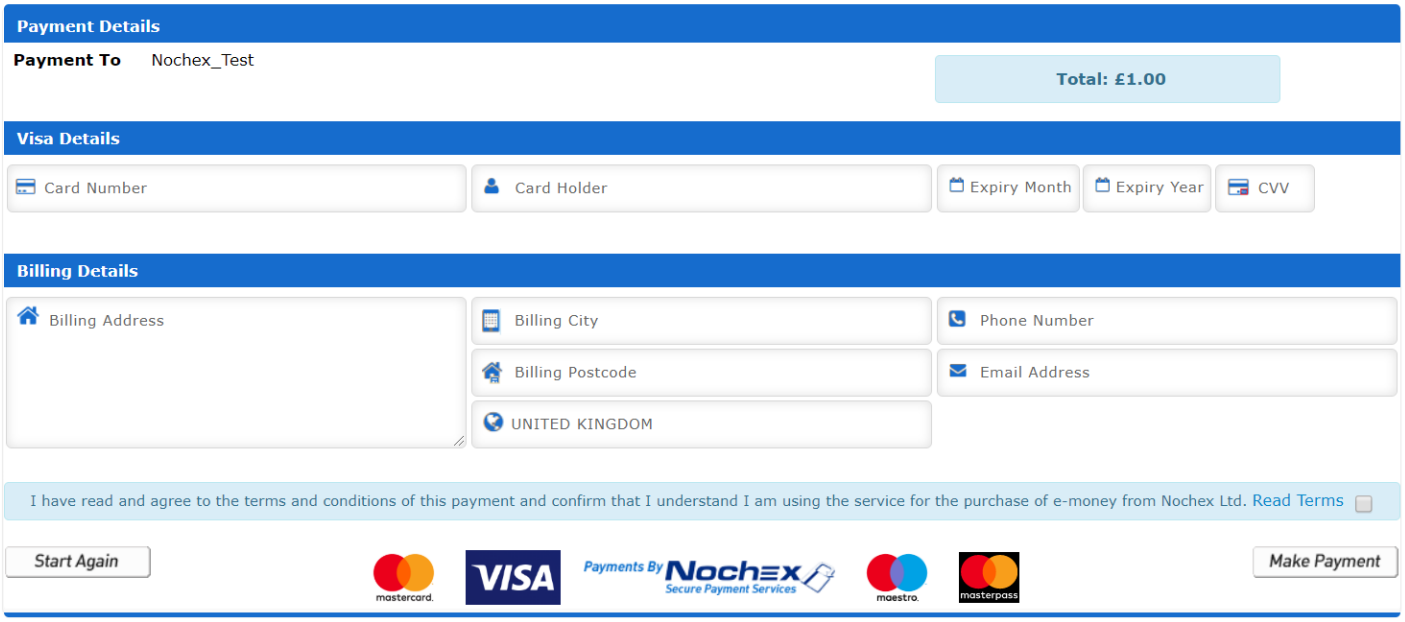
Experience the Payments Page
In order for you to appreciate your customer’s experience of the payment process, we have made available to you a test mode (Sandbox) that is described in full below.
To allow a test transaction to be made, you will need to enable a setting within your Nochex control panel. Follow these instructions to allow test transactions:
-
Login to your Nochex account
-
At your Control Panel click "Payments Page Setup"
-
Within the Test Transactions section check the option "Enable test transactions"
-
You will notice that another option appears: "Set account into test mode". If this option is checked then no live transactions can be processed
-
After selecting the options you wish to enable click Save Changes
If the "Set account into test mode" feature has not been selected you will need to send additional parameters through to the Payments page as shown below:
| Parameter Name | Required? | Description |
|---|---|---|
test_transaction | No | Set this parameter to "100" in order for test mode to beenabled. In test mode no actual money is sent |
test_success_url | No | Used for test transactions only, the URL that your customer is directed to once the payment has been successfully completed |
Example - Payment Form - Test Transaction
<form method="POST" action="https://secure.nochex.com/">
<input type="hidden" name="merchant_id" value="joefox@ukgadgetsrus.com">
<input type="hidden" name="amount" value="55.60">
<input type="hidden" name="test_transaction" value="100">
<input type="hidden" name="test_success_url" value="https://www.example.com/success.html">
<input type="submit" value="Pay on Credit or Debit Card with Nochex">
</form>
The extra parameters sent as part of the "Payment Details" process. The payments page will behave as it usually does with the following exceptions.
-
No field data will be validated, but you will still be required to enter data into the relevant page fields. This allows you to experience the same behaviour as the consumer would experience when making a payment. Since no data is validated you can use any 16 digit card number - we suggest you use "1234567890123456"
-
The Nochex option in the "Payment Method" section will not be available since this test mode is designed to allow you to test a complete purchase cycle using a credit or debit card
Once a payment is completed in this test mode, the usual email notifications will be sent with a note at the top of each email stating that it relates to a test transaction.
If you have enabled the Automatic Payment Confirmation (APC) functionality then the APC will be sent as usual with the status parameter set to "test" (live transactions are marked with the status parameter of the APC being set to "live").
Please note we recommend that you ensure that the status field of your APC is "live" when you start processing live transactions.
To enable APC, simply send in the callback_url as part of the payment request.
For further information on setting up Nochex APC, click here.
Additional Merchant IDs
Should you sell goods/service through more than one platform, you can set up more Merchant ID's. In the example shown below, the Nochex Merchant has set up a website at www.ukgadgetsrus.com and uses an online auction company to sell his clearance items. He wishes to clearly identify the transactions within his control panel, which he can do by setting up a second alias.
The Merchant (Joe) used the email (Merchant_ID) of shop@ukgadgetsrus.com, which is his default email address. For his auction sales, he has set up a secondary alias - UKGRUS_AUCTIONS into which payments are made. By doing this, he can easily track and monitor the performance of both his online sales platforms.
To create additional Merchant ID's followed these steps:
-
Login to your Nochex Account
-
At your Control Panel click on "Payment Page Setup". This will display all your current Merchant ID's
-
To create a new ID, click "Add Merchant ID" and fill in all the necessary information
Secondary Merchant ID's cannot be email addresses. Separate payments pages can be set up for each Merchant ID.
Configure your Payments Page Setup
Access Payments Pages Setup
-
Login to your Nochex Account
-
At your Control Panel click on "Payment Page Setup"
Payment Page Setup - Options
One of the main features of the Nochex Payments Pages system is to allow a full customisation of these pages. To edit your checkout pages, login to your Nochex account and click "edit payments pages." Ensure that the correct merchant ID is selected and then edit the parameters (shown below.) Each merchant ID can be configured differently for optimal customisation. Please note, if you do not edit the Payments pages, the default Nochex Payments Pages will be shown.
Account holders must not add references to CSS files stored on unsecure servers. Customers must either link to a style sheet on a secure server or copy the style settings into their header HTML field.
We recommend that customers minimise the number of images as a large number may slow down the loading of the Payments Pages. Where possible, images should be stored on a secure server.
The following payment page options can be edited within the control panel (see next page).
Payments Page Setup - Options
| Setting Name | Parameter Name | Description |
|---|---|---|
| Description | N/A | The brand name for your Merchant ID. This is what shoppers see when making payments. Your email address is the default. This facility allows you to change it to your company name |
| Header HTML | Header_html | The HTML that will be displayed before the Payments page HTML elements is displayed. This can be used to customise the Payments page to look like your web site |
| Footer HTML | Footer_html | HTML that will be displayed after the Payments page HTML elements are displayed. This can be used to customise the Payments page to look like your web site |
| Font Name | Font_name | The style of the font used on the Payments page |
| Font Colour | Fore_colour | The font colour used on the Payments page |
| Background Colour | Back_colour | The background colour used on the Payments page |
| Continue Button | continue_button_image | The location of image used when displaying the "Continue" button on the Payments page |
| Make Payment Button | makepayment_button_image | The location of image used when displaying the "Make Payment" button on the Payments page |
| Cancel Button | cancel_button_image | The location of image used when displaying the "Cancel" button on the Payments page |
| Start Again Button | startagain_button_image | The location of image used when displaying the "Start Again" button on the Payments page |
| Close Window Button | closewindow_button_image | The location of image used when displaying the "Close Window" button on the Payments page |
| Print Receipt Button | printreceipt_button_image | The location of image used when displaying the "Print Receipt" button on the Payments page |
| Cancel URL | cancel_url | The URL your customer is directed to if they decide to cancel the payment. The cancel button is only shown on the Payments page if this parameter is set |
| Call back URL | callback_url | The URL that Nochex will send a notification to once a successful payment is made. At this stage the APC functionality that you may currently use is unchanged |
| Success URL | success_url | The URL your customer is directed to once the payment is successfully completed |
| Auto Redirect | N/A | If this option is enabled then your customer will be automatically redirected to the Success URL once the payment is successfully completed |
| Request Additional Customer Information (e.g. product colour) | ask_more_info | If this option is enabled then your customer will be asked for further information about the payment |
| Request Delivery Address | N/A | If this option is enabled your customer will be asked to supply a delivery address with the payment |
| Show Order ID | N/A | If this option is enabled your customer will be shown the Order ID (if supplied) on the Payments page |
| Enable Consumer Email Payment Confirmation | N/A | Usually after a payment is made to your account the customer will get a payment confirmation email. If this option is disabled the customer will not receive a confirmation email |
| Enable test transactions | N/A | If enabled this option allows test transactions to be made |
| Set account into test mode | test_transaction | If this option is enabled no live transactions can be processed |