APC
Introduction to APC
Automatic Payment Confirmation (APC) allows you to integrate your Nochex payments with your back-end operations to get immediate onfirmation and authentication of the Nochex payments you receive.
Using APC offers a wide range of extra functionality, such as
- Process your customers payments in real time
- Give immediate feedback to your customers
- Store your Nochex payments in your own database
- Ideal for online products, such as website membership
Your customers will benefit also from APC as they will get an immediate response to the order they have placed in addition to their Nochex transaction email.
What is APC?
APC authenticates a payment that is made into your Nochex account by communicating with your server. To start using APC you are required to create a listener, the following information explains what a listener exactly is and how to implement one.
How can the Nochex APC benefit my business by authenticating total amount paid?
The Nochex APC system can benefit your business and allow you to authenticate an amount paid for, by the customer is actually the amount they should have paid. If the amount is less then a negative impact could impact your services and products offered to your customers, and potentially leave your business out of pocket.
APC listener
To process APC responses you will need a listener page, this is script or code that will wait for an APC response from Nochex.
After your listener has received a response it is required to send the same information back to the Nochex server to confirm the details re matching. Once these checks have been made and you know the transaction has been successful you can carry out various actions such as:
- Update order status (For example: Processing to Paid).
- Update list of customer details
- Enable customers to download media e.g. purchasing an eBook
Your APC listener can be written in any scripting language or programming language you choose, example code that could be used is included in this document or found here, and hosted on your web server.
Once you have uploaded the listener page to your web server, enter the URL to your APC listener into the Callback URL field within the Payment Page Setup in your Nochex account.
Creating a listener
Below is the functionality that must be included when creating your APC listener:
-
Wait for an HTTP POST from the Nochex server.
-
Once received, construct a HTTP POST to Nochex with all the form variables you received exactly as you received them. Your POST should be sent to: https://secure.nochex.com/apc/apc.aspx
-
Wait for response from Nochex server either "AUTHORISED" or "DECLINED".
-
If the response is "AUTHORISED", you need to do the following checks:
- Check the "transaction_id" against the previous Nochex transaction you have processed to ensure it is not a duplicate.
- Make sure the "to_email" is the email address registered in your Nochex account
- Check that the amount, transaction date and other variables match the transaction on your website.
- Once you have completed the above checks, you may update your database based on the information provided.
-
After all checks have been carried out and you have confirmed they are valid details, carry out any further actions you wish.
-
If you received a "DECLINED" notification, it should be treated as suspicious and investigated.
Setting up Call back URL/Responder URL
-
Login to your Nochex account
-
Click Payment Page Setup
-
Specify the URL for your APC listener in the Call back URL field.
You can also set up the call back URL within the HTML form POST to Nochex using the below parameter.
| Parameter Name | Description |
|---|---|
callback_url | The URL that Nochex will send a notification to once a payment is made. |
Form example:
<form method="POST" action="https://secure.nochex.com/">
<input type="hidden" name="merchant_id" value="yourmerchantid">
<input type="hidden" name="amount" value="55.60">
<input type="hidden" name="callback_url” value="http://myWebsite.com/apchandler.php">
<input type="submit" value="Pay on Credit or Debit Card with Nochex" />
</form>
APC Step-by-Step
How APC works
-
A customer visits your website and decides to use the Nochex payment option.
-
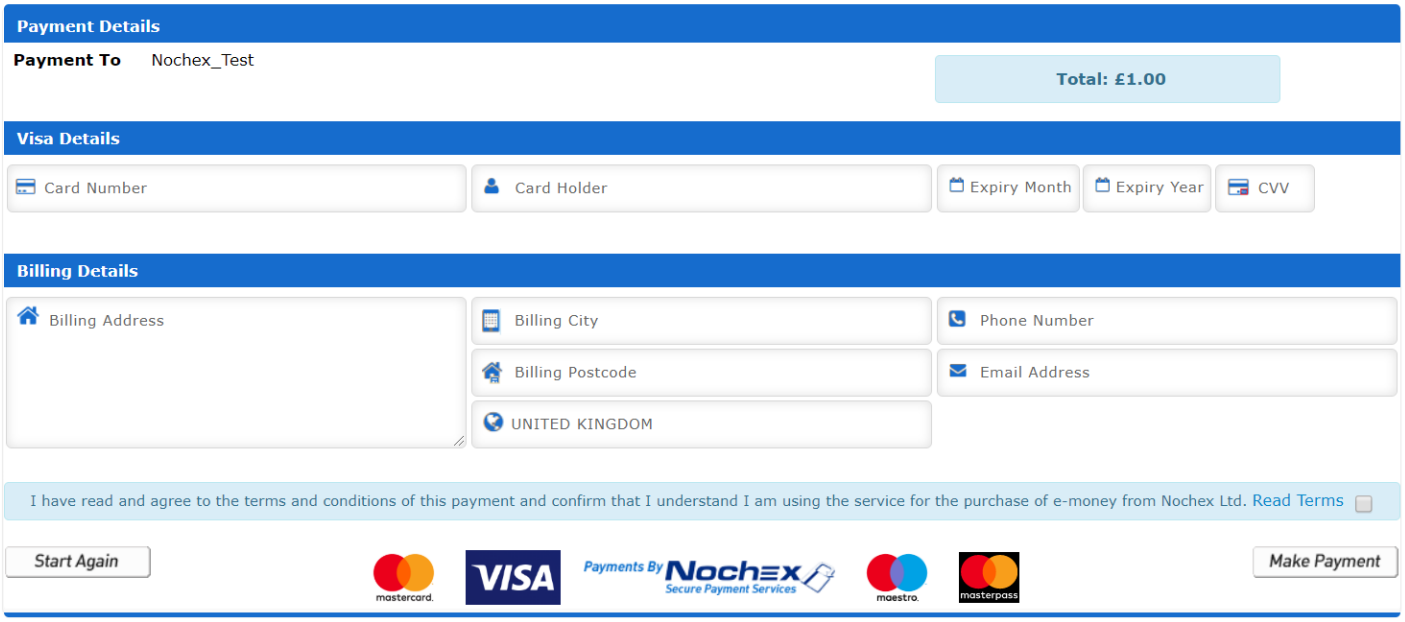
The customer is then directed to the Nochex payment page where they enter their details and make a payment.
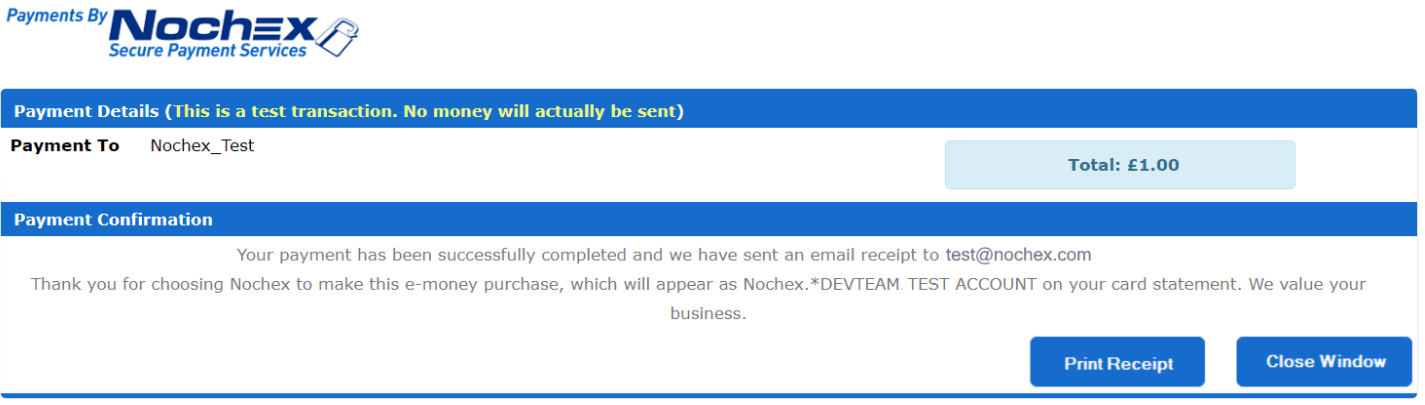
- After the customer has confirmed the payment, they are directed to the Nochex confirmation page:
-
Once the payment has been made, in the background the Nochex server will post a confirmation to your APC listener. The confirmation includes the information about the transaction, such as; the amount paid as well as a security key unique to that transaction.
-
Once your server receives the confirmation, the APC listener should return all of the information posted to you to the Nochex APC authentication page including the unique security key to ensure it is the same transaction.
-
The Nochex authentication page will then respond to your server with an "AUTHORISED" or "DECLINED" message.
-
When your server receives the "AUTHORISED" response, you should check the details to make sure that the amount and email address match to those that were sent. However if a "DECLINED" response is received it should be treated as suspicious and investigated.
-
Once you have checked all the relevant data you can update your database or carry out any other actions you wish and then continue with the purchase process.
APC Diagram
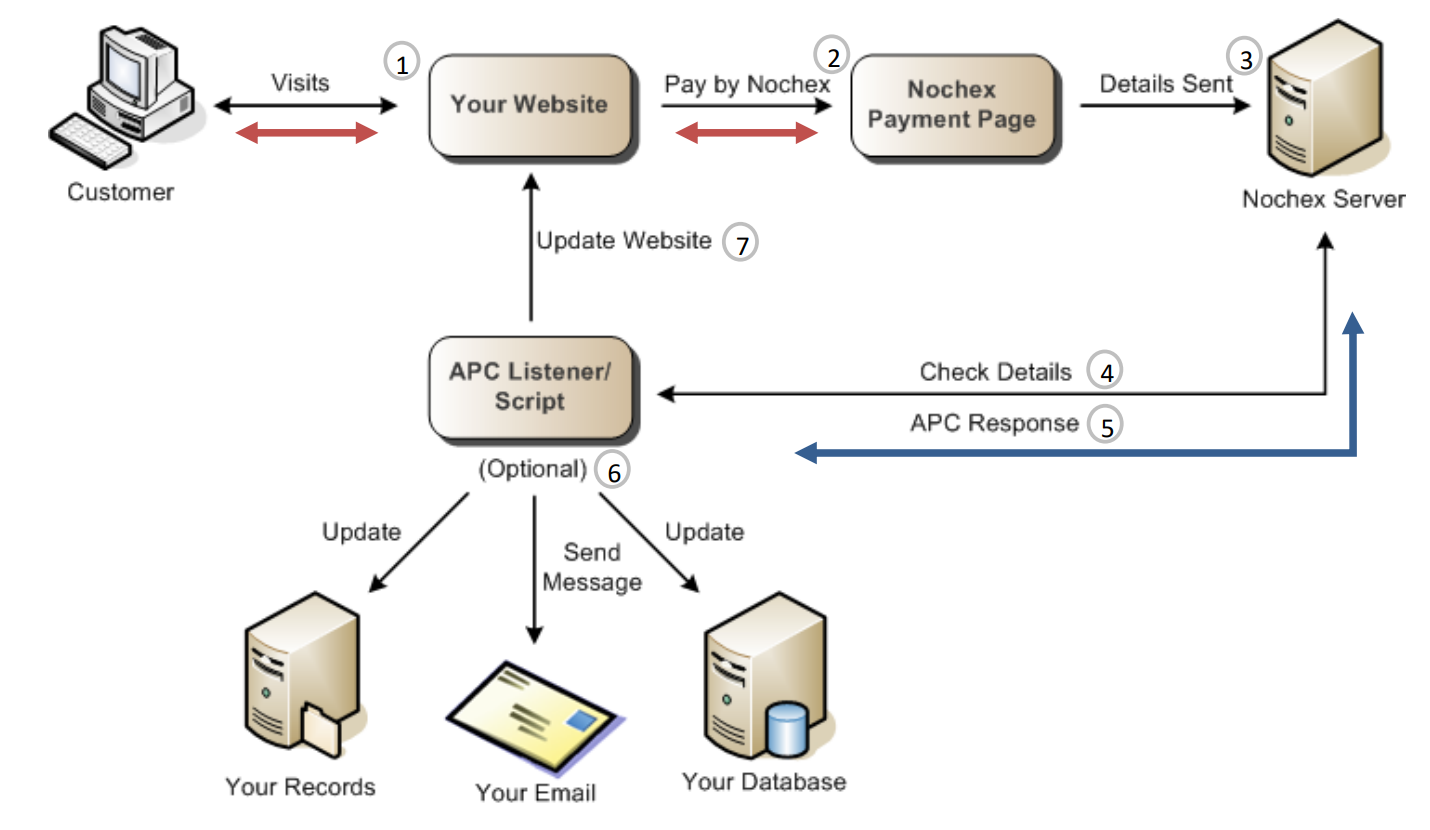
| Legend: | |
|---|---|
| The red arrows show the customer's experience, they just see the immediate effects. They will see the updated webpage after APC has been successful. | |
| The blue arrow shows the APC token and what route it takes round the system. |
Steps:
-
A customer visits your website.
-
Your customer decides to pay using Nochex, which you have integrated into your website.
-
Once your customer has entered all their details they will be sent to the Nochex server to be checked.
-
The details you received are then posted back to the Nochex server using your APC listener.
-
The Nochex server will then send an APC response to your APC listener with either an "AUTHORISED" or "DECLINED" response; for the purpose of this diagram we assume it was the "AUTHORISED" response.
-
You can implement various optional actions within your APC listener, some of which include; sending an email with the APC response to your email address and updating your database or records.
-
After the optional actions and checking of details are complete you can then update your website, either to show a success URL or the current status of your customer's order.
APC Variables
These are the variables that will be processed between your server and the Nochex server. It is important that every variable is passed to the Nochex server exactly as it was received.
| Variables | Value | Description | Example |
|---|---|---|---|
to_email | Transaction specific | Email address of the payment recipient. | merchant@nochex.com |
from_email | Transaction specific | Email address of the payment sender. | customer@nochex.com |
transaction_id | Transaction specific | Unique code generated to distinguish transactions. | 1793359 |
transaction_date | Transaction specific | Date/time stamp of transaction. | 15/02/2010 17:20:46 |
order_id | Transaction specific | Transaction specific code, order id as passed by you, the merchant. Your customer is not able to view or edit this. It must be unique per transaction | 999999 |
amount | Transaction specific | Full amount of the customer's payment. | 5.99 |
security_key | Transaction specific | System generated key (for Nochex use) | 16736 |
status | Live or Test | Used to distinguish a test transaction where no money has been sent, from a live transaction where money has been sent. | test |
Example Code
The below are code sample of APC listeners:
- PHP
- C#
- CURL
- ASP
<?php
// Payment confirmation from http post

$your_email = 'your_email@example.com';  // your merchant account email address


function http_post($server, $port, $url, $vars) {
    // get urlencoded vesion of $vars array
    $urlencoded = "";
    foreach ($vars as $Index => $Value) // loop round variables and encode them to be used in query
    $urlencoded .= urlencode($Index ) . "=" . urlencode($Value) . "&";
    $urlencoded = substr($urlencoded,0,-1);   // returns portion of string, everything but last character

    $headers = "POST $url HTTP/1.0\r\n";  // headers to be sent to the server
    $headers .= "Content-Type: application/x-www-form-urlencoded\r\n";
	$headers .= "Host: www.nochex.com\r\n";
    $headers .= "Content-Length: ". strlen($urlencoded) . "\r\n\r\n";  // length of the string

	//$hostip = @gethostbyname("www.nochex.com");

	/*echo "Nochex IP Address = " . $hostip . "<br/><br/>";

	echo "Headers = " . $headers . "";*/

    $fp = fsockopen($server, $port, $errno, $errstr, 20);  // returns file pointer
    if (!$fp) return "ERROR: fsockopen failed.\r\nError no: $errno - $errstr";  // if cannot open socket then display error message

    fputs($fp, $headers);  //writes to file pointer

    fputs($fp, $urlencoded);

    $ret = "";
    while (!feof($fp)) $ret .= fgets($fp, 1024); // while it’s not the end of the file it will loop
    fclose($fp);  // closes the connection
    return $ret; // array
}

// uncomment below to force a DECLINED response
//$_POST['order_id'] = "1";

//HTTPS
$response = http_post("ssl://secure.nochex.com", 443, "/apc/apc.aspx", $_POST);

// HTTP
//$response = http_post("secure.nochex.com", 80, "/apc/apc.aspx", $_POST);

// stores the response from the Nochex server
$debug = "IP -> " . $_SERVER['REMOTE_ADDR'] ."\r\n\r\nPOST DATA:\r\n";
foreach($_POST as $Index => $Value)
$debug .= "$Index -> $Value\r\n";
$debug .= "\r\nRESPONSE:\r\n$response";

echo $debug;

if (!strstr($response, "AUTHORISED")) {  // searches response to see if AUTHORISED is present if it isn’t a failure message is displayed
    $msg = "APC was not AUTHORISED.\r\n\r\n$debug";  // displays debug message
}
else {
    $msg = "APC was AUTHORISED."; // if AUTHORISED was found in the response then it was successful
    // whatever else you want to do
}

mail($your_email, "APC Debug", $msg);  // sends an email explaining whether APC was successful or not, the subject will be “APC Debug” but you can change this to whatever you want.
?>
<%@ Page Language="C#" AutoEventWireup="true" CodeFile="nochexapccsharp.aspx.cs" Inherits="nochexapccsharp" %>

<!DOCTYPE html PUBLIC "-//W3C//DTD XHTML 1.0 Transitional//EN" "http://www.w3.org/TR/xhtml1/DTD/xhtml1-transitional.dtd">

<html xmlns="http://www.w3.org/1999/xhtml">
<head runat="server">
    <title></title>
</head>
<body>
    <form id="form1" runat="server">
    <div>

    </div>
    </form>
</body>
</html>
<?php

// Get the POST information from Nochex server
$postvars = http_build_query($_POST);
ini_set("SMTP","mail.nochex.com" );
$header = "From: apc@nochex.com";

// Set parameters for the email
$to = 'your_email@nochex.com';
$url = "https://secure.nochex.com/apc/apc.aspx";

// Curl code to post variables back
$ch = curl_init(); // Initialise the curl tranfer
curl_setopt($ch, CURLOPT_URL, $url);
curl_setopt($ch, CURLOPT_VERBOSE, true);
curl_setopt($ch, CURLOPT_RETURNTRANSFER, true);
curl_setopt($ch, CURLOPT_SSL_VERIFYPEER, false);
curl_setopt($ch, CURLOPT_POST, true);
curl_setopt($ch, CURLOPT_POSTFIELDS, $postvars); // Set POST fields
curl_setopt($ch, CURLOPT_HTTPHEADER, "Host: secure.nochex.com");
curl_setopt($ch, CURLOPT_POSTFIELDSIZE, 0);
curl_setopt($ch, CURLOPT_FOLLOWLOCATION, 1);
curl_setopt($ch, CURLOPT_TIMEOUT, 60); // set connection time out variable - 60 seconds
//curl_setopt ($ch, CURLOPT_SSLVERSION, CURL_SSLVERSION_TLSv1); // set openSSL version variable to CURL_SSLVERSION_TLSv1
$output = curl_exec($ch); // Post back
curl_close($ch);

// Put the variables in a printable format for the email
$debug = "IP -> " . $_SERVER['REMOTE_ADDR'] ."\r\n\r\nPOST DATA:\r\n";
foreach($_POST as $Index => $Value)
$debug .= "$Index -> $Value\r\n";
$debug .= "\r\nRESPONSE:\r\n$output";

//If statement
if (!strstr($output, "AUTHORISED")) {  // searches response to see if AUTHORISED is present if it isn’t a failure message is displayed
    $msg = "APC was not AUTHORISED.\r\n\r\n$debug";  // displays debug message
}
else {
    $msg = "APC was AUTHORISED.\r\n\r\n$debug"; // if AUTHORISED was found in the response then it was successful
    // whatever else you want to do
}

//Email the response
mail($to, 'APC - After If statement', $msg, $header);
?>
<%@ Language=VBScript %>

<%
'requires Microsoft XML Parser http://msdn.microsoft.com/xml
Dim objHttp 'object used for posting form data to nochex
Dim nochexformdata 'variable used to store form data sent from Nochex
Dim NochexResponse 'stores the response from the Nochex server
Dim objEmail
dim smtpServer
' smtpServer = "mail.nochex.com"
nochexformdata = request.Form 'copy the form data from Nochex into the variable
set objHttp = Server.CreateObject("Microsoft.XMLHTTP") 'create an instance of the XML object library
objHttp.open "POST", "https://secure.nochex.com/apc/apc.aspx", false 'set the page to post the form data to the Nochex server
objHttp.setRequestHeader "Content-Type", "application/x-www-form-urlencoded"
objHttp.Send nochexformdata 'send the form data received from Nochex to the NOCHEX server
' Check notification validation
if (objHttp.status = 200 ) then
	if (objHttp.responseText = "AUTHORISED") then
		NochexResponse = "AUTHORISED"
	'check the transaction_id to make sure it is not a duplicate
	'process transaction
	elseif (objHttp.responseText = "DECLINED") then
		NochexResponse = "DECLINED"
		'log and investigate incorrect data
	end if
else
	NochexResponse = "NO RESPONSE "
end if
'Response.Write(NochexResponse)

Set objEmail = CreateObject("CDO.Message")
 objEmail.From = "apc@nochex.com"
 objEmail.To = "your_email@nochex.com"
 objEmail.Configuration.Fields.Item _
 ("http://schemas.microsoft.com/cdo/configuration/sendusing") = 2
 objEmail.Configuration.Fields.Item _
 ("http://schemas.microsoft.com/cdo/configuration/smtpserver") = _
     "mail.nochex.com"
 objEmail.Configuration.Fields.Item _
 ("http://schemas.microsoft.com/cdo/configuration/smtpserverport") = 25
 objEmail.Configuration.Fields.Update

 objEmail.Subject = "Your APC was " & NochexResponse
 objEmail.TextBody = "APC Response was: " & NochexResponse & " for order:" & Request.Form("order_id") & ", amount:" & Request.Form("amount") & ". This was a " & Request.Form("status") & " transaction"
 objEmail.Send
%>
Testing APC
To test your APC code or script, we have provided a few instructions below;
Firstly, copy one of our APC listener examples from before, for example the PHP code.
Next, paste the code into a text editor such as: Notepad or something similar;
Replace $to = ""; with your email address, e.g. $to = "myEmail@example.com";
Save all changes, and upload the page to your website, so you have the URL: https://mywebsite.com/yourAPCfile.php go directly to the page and you will receive a declined response.
Next, create a Nochex html payment form, which will make a POST to your Nochex payment page including the callback_url parameter.
For example;
<form method="POST" action="https://secure.nochex.com">
<input type="hidden" name="merchant_id" value="<yourmerchantID>"/>
<input type="hidden" name="amount" value="1.00"/>
<input type="hidden" name="test_transaction" value="100"/>
<input type="hidden" name="callback_url" value="<yourcallbackURL>"/>
<input type="submit" value="Make Payment" />
</form>
Replace the following;
<yourmerchantID> to your Nochex registered email address/merchant ID, e.g. myEmail@example.com
<yourcallbackURL> to the location of your Callback page on your website, e.g. mywebsite.com/yourAPCfile.php
<form method="POST" action="https://secure.nochex.com">
<input type="hidden" name="merchant_id" value="myEmail@example.com"/>
<input type="hidden" name="amount" value="1.00"/>
<input type="hidden" name="test_transaction" value="100"/>
<input type="hidden" name="callback_url" value="https://mywebsite.com/yourAPCfile.php"/>
<input type="submit" value="Make Payment" />
</form>
Save your payment form, and open it in a web browser
Press your Make Payment button which will redirect you to your payment page and then go through the payment process till you have got to the Nochex success page. Once you have got to your Nochex success page, check your emails to make sure you have received an email for your recent transaction and a response of 'Authorised' from your callback script with subject line: 'Callback'
You can also complete a test transaction from your Nochex control panel. Just follow these steps:
-
Login to your Nochex account
-
At the control panel select "Payments Page Setup" (only available if you have a merchant account)
-
Enter your APC handler URL in the "Call back URL" field and click "Save Changes"
-
Click the "Test Transaction" button at the bottom of the page and complete a test transaction
-
Your APC handler code should contain a mail/debug function so after an APC response is obtained you know the result
Debugging APC
If APC doesn't work correctly there is a handy method of debugging your code. Add a mail function within your code that sends an email to you at different places within the code. Firstly have one that emails you right at the beginning of the code so you know for sure that the file is actually being called. Then have an email function sending the variables as this enables you to check at certain intervals in your code, whether or not the right information is being stored and are being sent correctly.
Below is a PHP code example implementing the mail function in two different places and as always when a declined response is received an email is sent with the debug details:
<?php
// Payment confirmation from http post

$your_email = 'you@domain.com'; // your merchant account email address
mail($your_email, "APC", "Being called?");

function http_post($server, $port, $url, $vars) {
.
.
.
.
 }
$response = http_post("ssl://secure.nochex.com", 443, "/apc/apc.aspx", $_POST);
// stores the response from the Nochex server
$debug = "IP -> " . $_SERVER['REMOTE_ADDR'] ."\r\n\r\nPOST DATA:\r\n";
foreach($_POST as $Index => $Value)
$debug .= "$Index -> $Value\r\n";
$debug .= "\r\nRESPONSE:\r\n$response";
mail($your_email, "APC", $debug);

if (!strstr($response, "AUTHORISED")) { // searches response to see if AUTHORISED is present if it isn't a failure message is displayed
 $msg = "APC was not AUTHORISED.\r\n\r\n$debug"; // displays debug message
}
else {
 $msg = "APC was AUTHORISED."; // if AUTHORISED was found in the response then it was
successful
 // whatever else you want to do
}
mail($your_email, "APC Debug", $msg); // sends an email explaining whether APC was successful or not, the subject will be "APC Debug" but you can change this to whatever you want.
?>
APC Troubleshooting Tips
"DECLINED" Message
If you receive a DECLINED response:
-
Go back and carefully check your code, make sure that each variable is passed to the Nochex server without changing them at all.
-
Ensure that you are posting the information to the right URL, https://secure.nochex.com/apc/apc.aspx
No Message Received
If your APC listener/script doesn't send an email to you when it should:
-
Check that the APC listener is actually being called by creating a test email script, if by doing this you receive an email you can conclude that there is a problem with your APC listener code.
-
Check your code carefully to ensure the right email address is being used.
-
Check that your firewall settings aren't blocking the HTTP POST messages from Nochex; if you are unsure of this contact your hosting company.
-
Look back at this guide and use the working examples and expand on them.